Yes, you can spend thousands remodeling a builder-grade home and renovate it from top to bottom. New kitchens, custom cabinetry, built-ins, flooring, and wall treatments can completely transform it. But if a major renovation isn’t in your plans right now, here’s the good news: you can still make a builder-grade home feel far more custom without tearing anything apart.
The 10 fixes to make a Builder-Grade Home look custom, at a glance:
- Layer the lighting (ambient, task, accent)
- Hang curtains high, wide, and full
- Introduce texture and pattern
- Break the builder beige with color
- Add architectural details (molding, trim, doors)
- Bring something personal into the space
- Create a cozy corner
- Upgrade the cabinet hardware
- Frame the bathroom mirror
- Swap the plastic switch plates and vents
You might also like: 15 Budget-Friendly Decor Ideas You’ll Wish You Tried Sooner
Why your brand-new home feels so blank

You finally got the keys. It’s the most money you’ve ever spent on anything, the floors are spotless, nothing is broken — and somehow you walk in and feel a little let down. It looks like a model home. It looks like your neighbor’s. You can’t quite explain what’s missing. You imagined it feeling warm, welcoming, and uniquely yours. Instead, it still feels like the beautifully staged home you toured before signing the papers. And you’re starting to quietly wonder if you just have bad taste.
You don’t !

The good news is that what you’re seeing isn’t a decorating failure. It’s simply the starting point. You can usually tell a brand-new builder home from the doorway—not because of one big flaw, but because of a hundred small decisions that were made to appeal to everyone. The same light fixtures. The same paint colors. The same doors, trim, and finishes used in hundreds of other homes. Everything sits at a similar tone, the lighting is often a little flat, and there’s nothing with enough texture, contrast, or personality for the eye to settle on, which is why a brand-new house can still feel generic
So here’s the reframe I give clients all the time: your home isn’t lacking potential. It’s just waiting for the finishing touches. The builder gave you the structure, the layout, and the basics. The warmth, character, and custom feel come afterward.
And that’s the fun part.
10 designer fixes that make a builder-grade home feel custom
You don’t need to renovate the entire house to get there. A handful of thoughtful changes can completely shift how the space feels. Here’s the order I’d start with. Most of these upgrades are DIY-friendly. Most cost far less than people expect. Start with what you see and feel first: the lighting and the curtains.
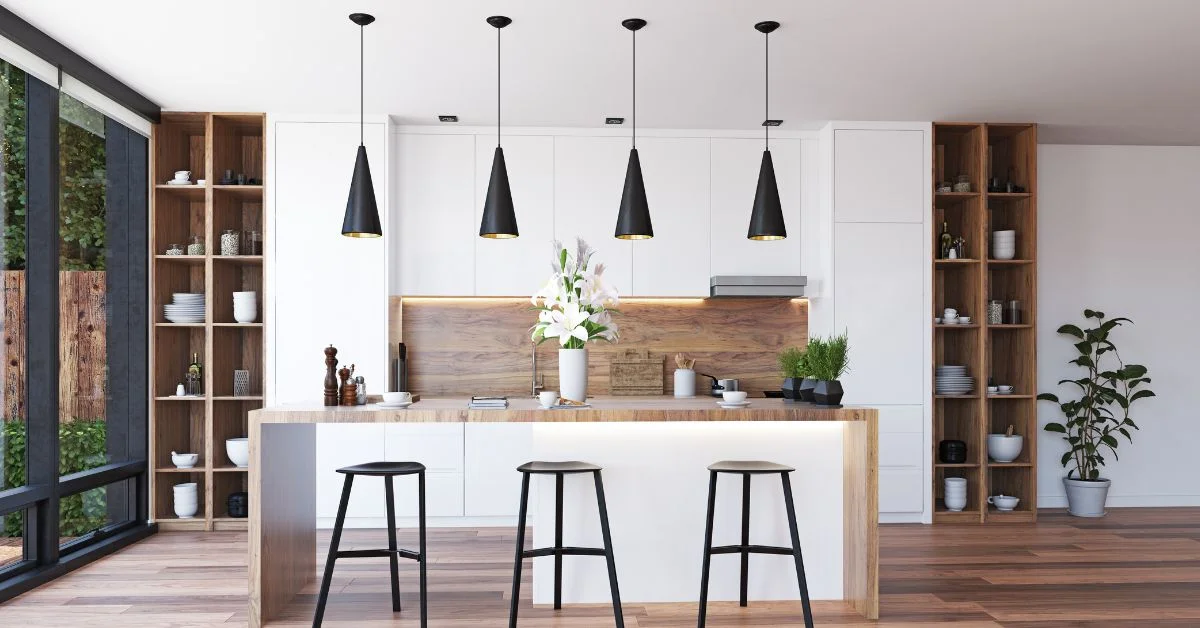
1. Layer the lighting
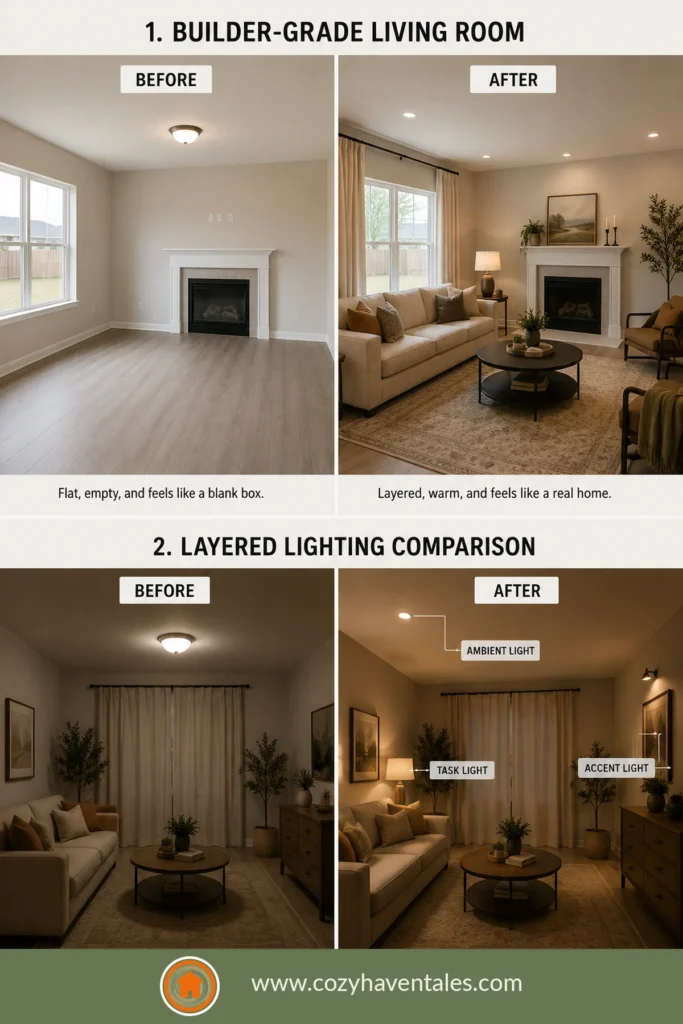
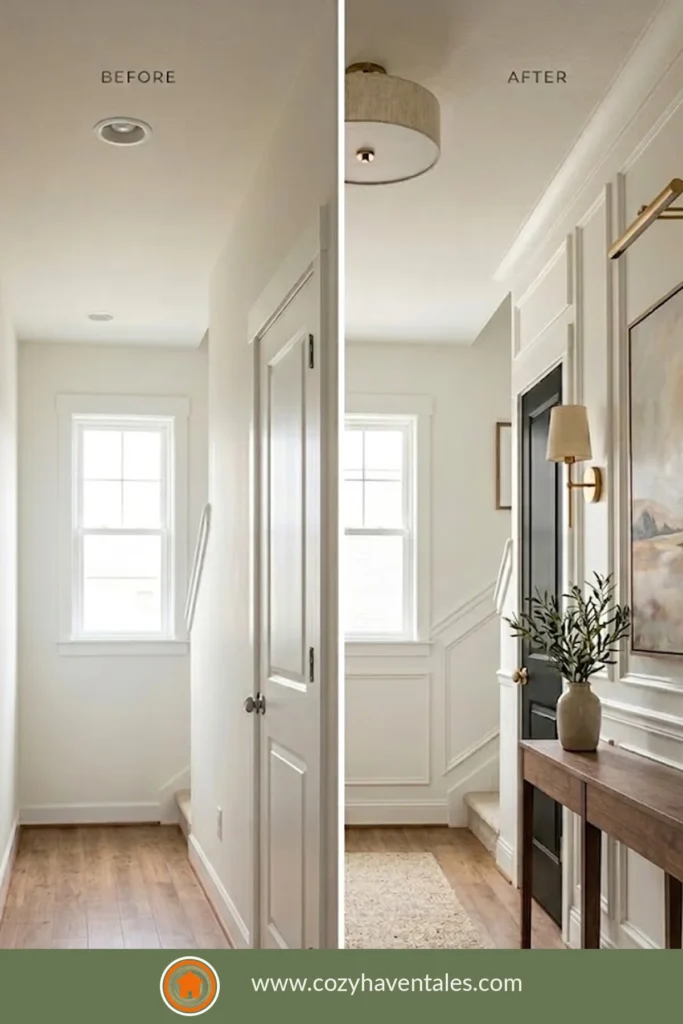
You can tell a builder home by its lights alone — that single frosted dome in the middle of the ceiling, throwing flat white glare straight down. One light source for a whole room is the most builder-grade move there is, and it flattens everything underneath it.
Real rooms use three kinds of light. Ambient is your general glow — but spread across a few softer sources, not one harsh fixture. Task is light where you actually do things: under-cabinet strips in the kitchen, a proper vanity light at the bathroom mirror, a reading lamp by the chair, focused light at a desk. Accent is the quiet finishing layer — a small light on art, a shelf, a niche, a plant. Stack those three and use warm 2700K bulbs throughout, and the room stops feeling like a waiting room and starts feeling designed.
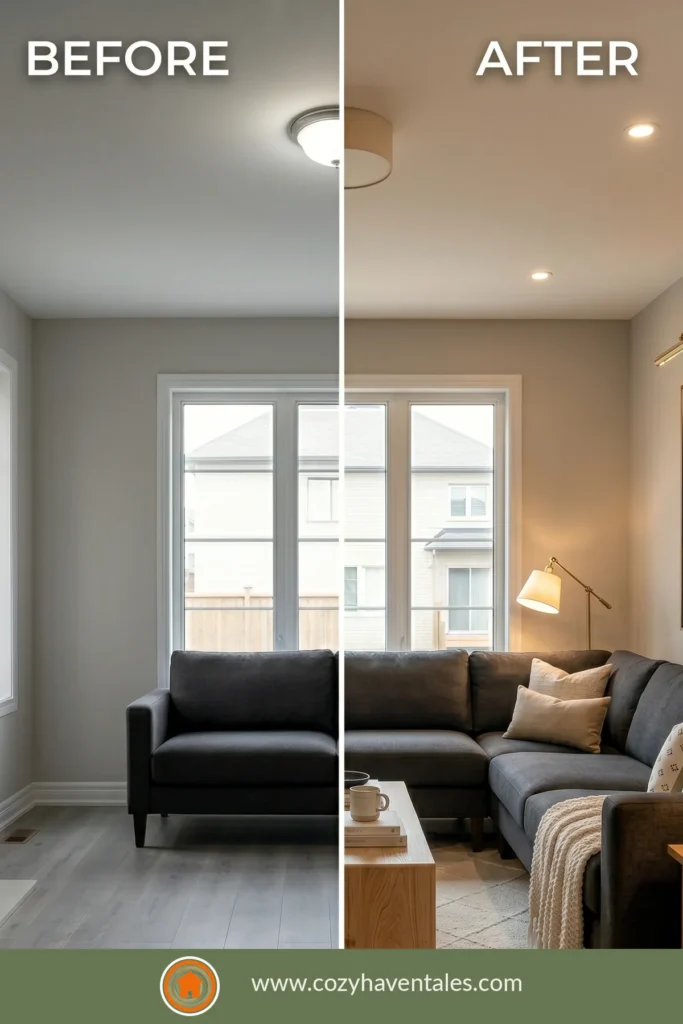
Designer tip: if you change one thing today, add task and accent light — that’s the layer builders never include.
2. Hang curtains high, wide, and full
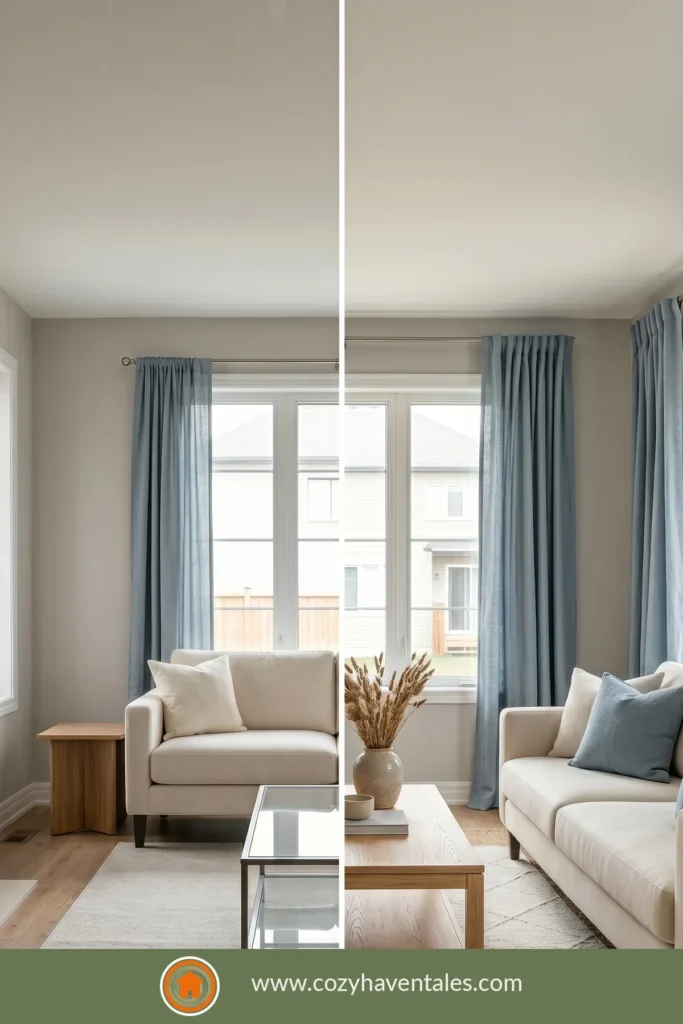
This is the one almost everyone gets wrong. Builders hang blinds and stop, and the people who do add curtains usually hang them like a café apron — rod on the frame, panels stopping at the sill, one flat width of fabric per side.
Two things fix it. First, go high and wide: mount the rod at least 9 inches (10–15 cm) above the frame, or higher toward the ceiling, and run it 8–12 inches (20–30 cm) past each side so the panels frame the glass, with the fabric dropping to just kiss the floor. Second — the part nobody talks about — go full. Flat, skimpy panels are exactly what makes a window look like a staged, for-sale model home. You want your panels to add up to roughly 2.5 to 3 times the width of the window so they hang in soft, generous folds. That fullness is the difference between “rented” and “this room was put together with care.”
3. Introduce texture and pattern
Here’s the real reason builder homes feel generic: every surface is smooth and matte and the same. Smooth drywall, smooth flooring, smooth everything. Your eye slides right off it with nothing to hold.
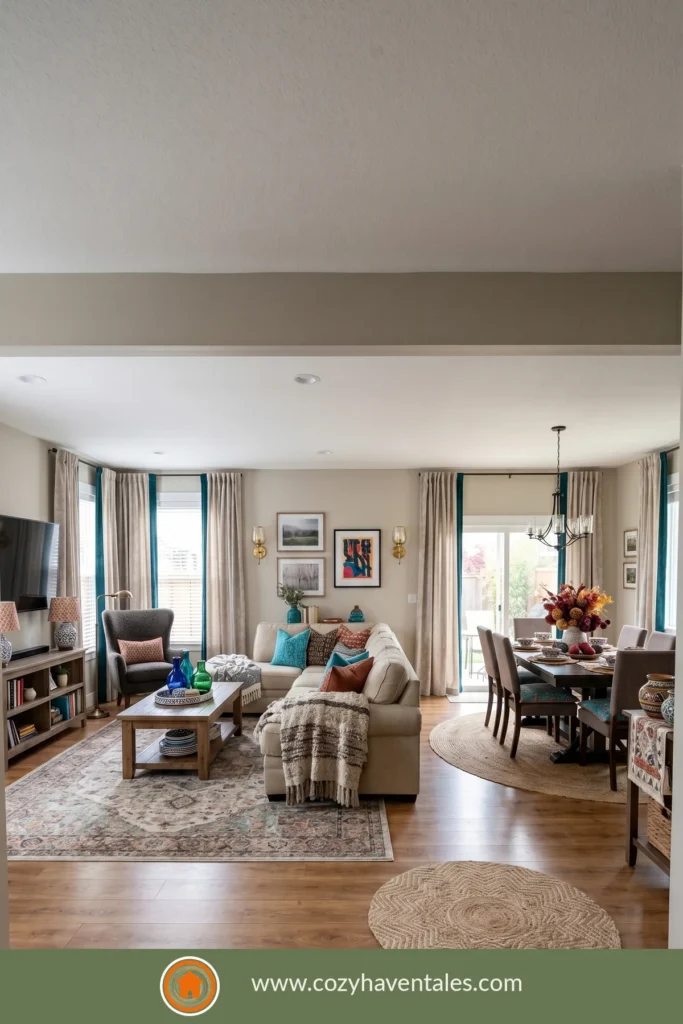
Texture is the cure, and it’s the most “you” part of the whole house. Layer in things with a surface and a story — a nubby woven throw, a chunky knit cushion, a jute or patterned rug underfoot, a real wood tray, a ceramic with some hand to it, a linen that wrinkles the way linen should. Then let a little pattern in: a print on the cushions, a check or stripe, a botanical. The goal isn’t matchy or loud. It’s a room with depth, where there’s something to notice in every corner instead of one flat beige surface after another.
Suggested read: 7 Ways to Add Texture in Interior Designing
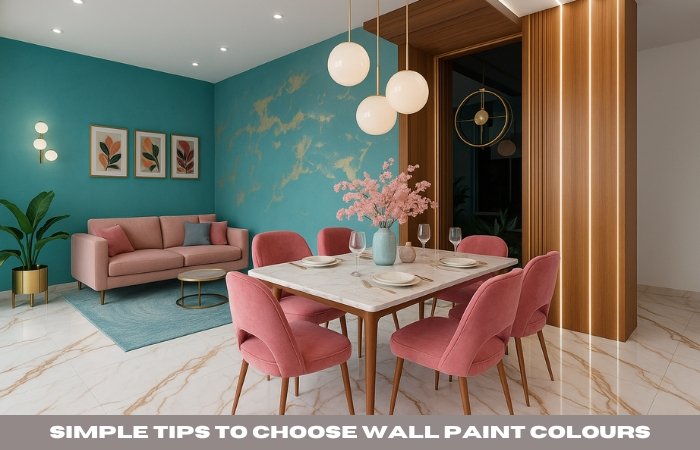
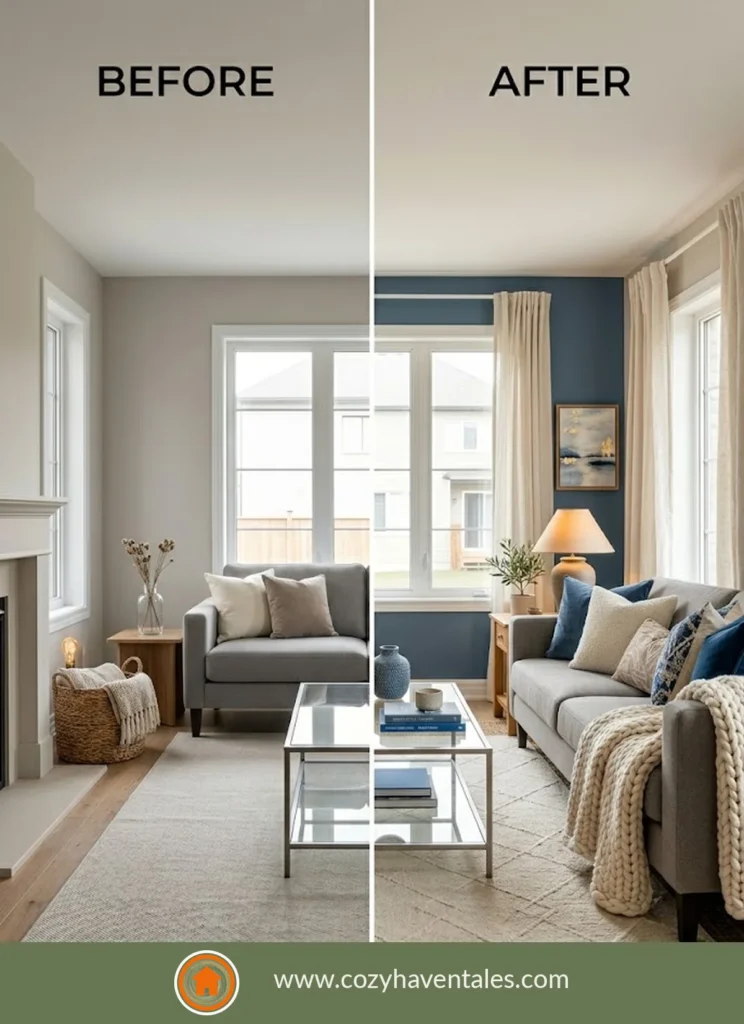
4. Break the builder beige with color
I hear this one almost word for word: “I own this place — so why does it still feel like a rental?” Nine times out of ten, it’s the paint. One safe beige, wall to wall, room to room, gives your eye nowhere to rest and tells you nothing about who lives there.
You don’t have to repaint the whole house. Keep one shared undertone so the rooms feel connected, then let one or two spaces go deeper and richer, or give a single wall some wallpaper — and choose colors you actually love, not the ones that photograph safely. (If you’ve got an open-plan layout and aren’t sure where one color should hand off to the next, I worked through that in my guide to making paint colors flow from room to room.) One honest opinion: skip the trendy bright accent wall as your first move. It dates fast, and it’s rarely the real problem.
5. Add architectural details
Builder walls are big, blank expanses of flat drywall, and that blankness reads as generic no matter how nice your furniture is. The fix is to give the walls something the builder skipped: architecture.

Thin picture-frame molding — simple trim arranged into rectangles — gives a wall the built-in look people assume costs a fortune, and it’s friendlier to a beginner than it looks. While you’re thinking about trim, those skinny builder baseboards (usually about 3¼ inches / 8 cm) look far richer capped or swapped up to a 5–7 inch (13–18 cm) profile. And don’t forget the doors: builder homes come with flat, hollow, bone-white doors that vanish into bone-white trim. Painting them a soft black or a deep, moody color — for the price of a sample pot — turns a $0 door into one of the most custom-looking things in the hallway.
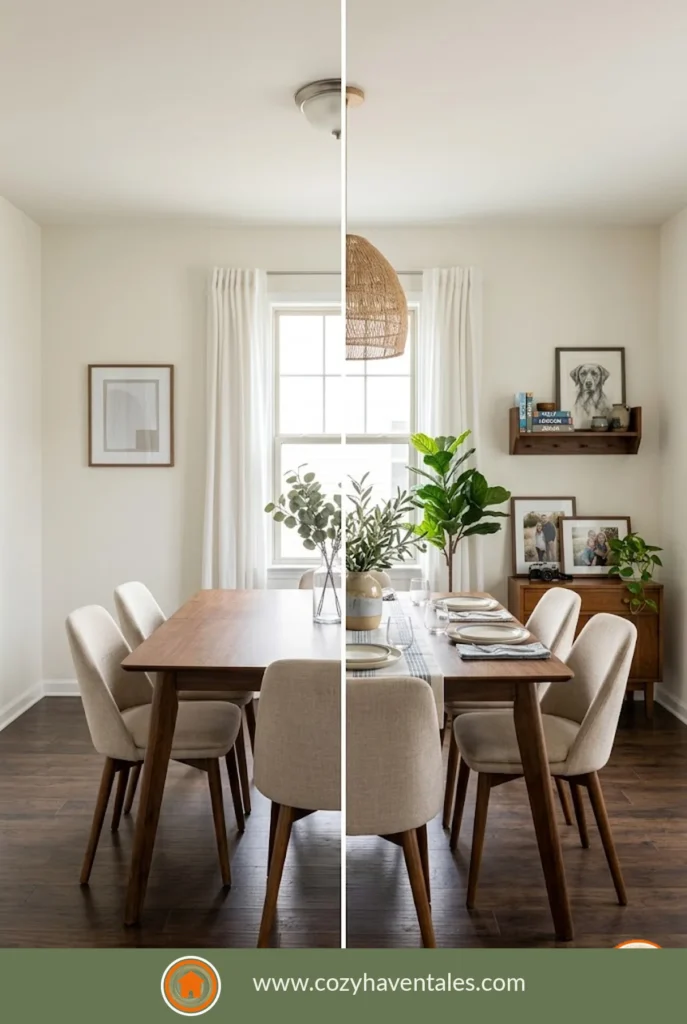
6. Bring something personal into the space

This is the single biggest difference between a builder home and your home, and it’s the one no amount of shopping can fake. A new build feels generic because it could belong to anyone. A custom-feeling home is full of quiet clues about the people who live there.
So put yourself on the walls and the shelves. A gallery wall of family photos or prints you actually chose. The books you’ve kept. A piece you brought back from a trip. Real art that means something to you, hung at eye level instead of left in a closet. A small display of whatever you’re into — records, pottery, plants, your kid’s drawings in nice frames. The room stops looking like a catalog and starts looking like a life.
7. Create a cozy corner
If you do nothing else on this list, do this one. Pick a corner — any corner — and turn it into a small spot that reflects how you actually live. This is the move that makes a house feel like yours.
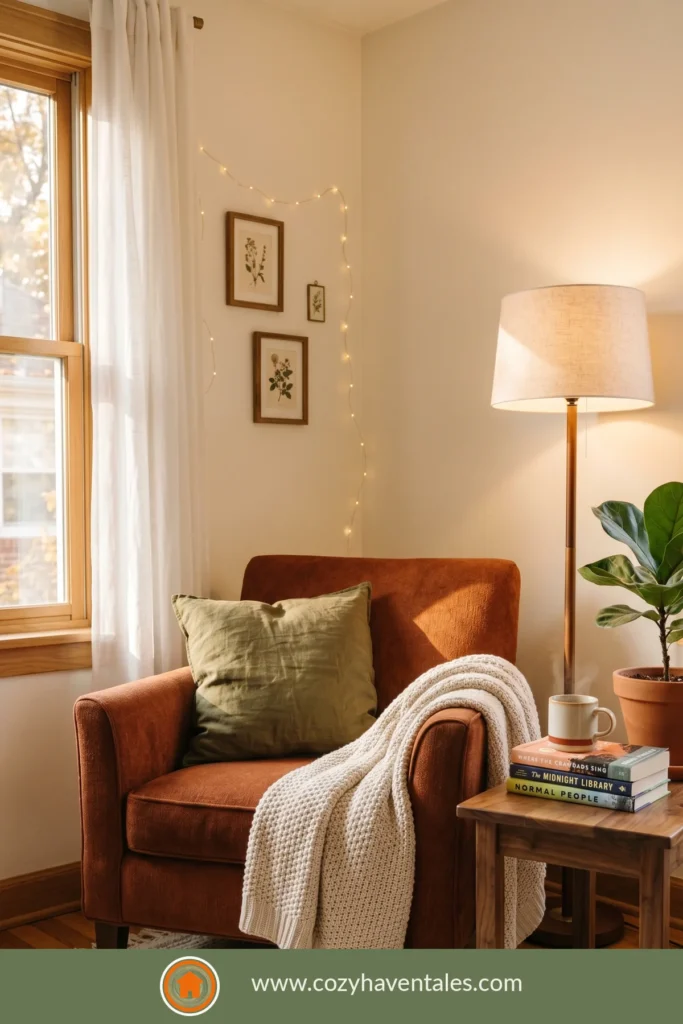
A reading chair with a lamp and a little side table. A coffee corner by the window. A window seat with a cushion and a few pillows. A meditation cushion in a quiet nook, a record player and a stool, a window perch for the cat. It doesn’t take much space or money — a chair, a light, something soft, something personal. But a cozy corner does what a switch plate never will: it gives the home a heartbeat. It’s the difference between a house you live in and a home that fits you.
8. Upgrade the cabinet hardware
Now the smaller, finishing swaps — cheaper and less dramatic, but they’re the details that separate “almost there” from “done.” Start with the cabinets. One of the fastest ways I spot a builder kitchen is the hardware: either there’s none and you’re opening doors by the edge, or it’s the exact knob found in a few hundred homes nearby.
Add knobs and pulls in a finish you love, ideally one that ties to your faucet and lighting, so your metals tell one story instead of three. They’re a few dollars each and go on with a screwdriver. A flat slab door reads as “someone chose this” the moment a good pull land on it.
9. Frame the bathroom mirror
That plain sheet of glass glued to the wall with little metal clips at the corners is probably the most builder-grade object in your house — and almost nobody thinks to touch it. A stick-on mirror frame or a bit of trim wraps the edge and makes the whole thing look built-in, like it cost five times more. Fifteen minutes, less than dinner out, and it’s one of the most satisfying before-and-afters there is.
10. Swap the plastic switch plates and vents
This is the detail pros notice and homeowners almost never do — and once you see it, you can’t unsee it. The cheap ivory plastic switch plates, the yellowing outlet covers, the big plastic return-air vent: tiny things that quietly broadcast “builder” in every room. Run a quick afternoon swap:
- Light switch plates and outlet covers (screwless metal ones look custom)
- The return-air and ceiling vents (paintable or wood/metal covers)
- The plain builder thermostat surround, if it’s an eyesore
It costs little and finishes the room so the small stuff stops shouting its price.
If this were my home and my budget: where I’d start
The list above runs roughly by impact. But if you’re on a tight budget and want momentum, I’d actually start with the cheapest wins to get the ball rolling: a weekend of cabinet hardware and switch plates, then the mirror frame — small money, fast payoff. From there, lighting and curtains for the biggest mood shift in the house. Then color, texture, and architecture as time and budget allow.
And I’d save the personal layers and the cozy corner for last — on purpose. They’re the reward, and they land far better once the backdrop is finished. The one mistake I watch people make every single time is spending big on the wrong thing first: new cabinets when they needed new knobs and warmer light, a statement backsplash before a single lamp. Five small finishing moves, in the right order, beat one expensive gesture nearly every time.
If you’re renting rather than owning, most of this still works — just in a no-damage, reversible form. I’ve gathered the deposit-safe versions in a separate renter-friendly guide.
FAQs
It’s the standard, lowest-cost version of the finishes a builder installs to keep a home affordable — basic light fixtures, plain cabinets, flat doors, thin baseboards, plastic switch plates, and one beige paint throughout. It isn’t poor quality so much as generic and unfinished, which is exactly why it’s so easy to fix.
Finish what the builder left plain: layer the lighting, hang fuller curtains high and wide, add texture and color, bring in molding and personal touches, and swap the small stuff like hardware, the mirror, and switch plates. None of it requires a renovation.
Lighting and curtains give the biggest mood shift, while cabinet hardware, the mirror frame, and switch plates are the cheapest high-impact swaps. Together they cost very little and change how the whole home feels.
Paint them, in almost every case. Painting costs a fraction of replacement and looks wonderful — as long as you prep properly and don’t rush it. Only replace if the cabinet boxes themselves are actually failing.
A cozy corner and your own things on the walls. A reading nook or coffee corner, a gallery wall, books, and meaningful pieces cost almost nothing and do more for a “custom” feeling than any single purchase.
Related Videos:
Suggested Other Articles:
- Fall Is Coming: What Not to Miss in Fall Home Decor Preparations
- Missing That Wow Factor? One of These 21 Blue Living Room Ideas Might Be What You’re Looking For
- Wish Your Home Felt Cozier? These Tuscan Style Interiors Might Be the Answer